Track Changes: an editor’s guide
This blog is for editors who are new to using this feature. If you are unsure how to deal with ‘tracked changes’ sent to you by someone else, please see my other blog: Using Track Changes: a client’s guide. However, you will find useful information in both blogs.
I use Microsoft Word, and this article explains what you will see when using a Word document. (A similar feature exists for Apple Mac Pages documents. The essential features are the same, but the terminology and screen layout will vary.) Please note that updates may change some of these features slightly – the screenshots here were taken at the time of writing in 2023.
Activating Track Changes
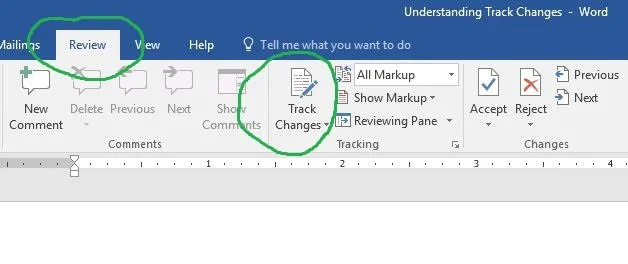
With your document open in Word, click the Review tab at the top of the screen. Under this tab, you will find sections for Comments, Tracking, Markup etc.
In the Tracking section, click the Track Changes button, then the same again in the sub-menu. The main button turns dark grey to show that this feature is switched on.
Now, when you add or delete anything, even just a word space, your changes will show in colour. A vertical line also appears on the left next to every line of text that has had a change.

Changing the colour of edits
The default setting is for deletions to be shown crossed through, and insertions to be shown underlined (this means that even inserted/deleted spaces are visible). However, you can choose how any editing changes will look on your device. Click the diagonal arrow at bottom right of the Tracking or Markup box. This brings up an Options panel. Click the Advanced Options button. (As this is a beginner’s guide, I don’t propose going into detail here. It’s for you to experiment!)
Choosing your view
A very useful feature is the ability to look at different views of your document. In the Tracking or Markup section is a drop-down menu with four options:
Simple Markup shows a red vertical line next to any line of text that has been changed, and any edits will appear in their new ‘correct’ form, but without showing the detail of exactly what has been inserted or deleted. Any margin comments also still show.
All Markup shows all deletions or insertions in a different colour. You can quickly see what’s been done, but the page does look messy!
No Markup just shows the text as it would appear with all edits accepted and incorporated.
Original shows the text as it was before editing.
These Markup views mean you can check what the corrected document will look like and flip back to editing again without committing yourself. Whichever view you choose, the edits are all still there, even if they are hidden.
Making decisions about edits
Once you have finished editing, you have two main choices. You may wish to leave the edits showing, for your own future reference or to send to a client or colleague. Or you may wish to incorporate all the changes so that you have a corrected copy ready to use.
Incorporating the changes can be done in two ways: individually, or all at once.
Accept or reject individual edits
Still on the Review tab, near the Tracking section, you will find Accept and Reject buttons. To check each edit, begin by clicking just before the first change in the document. You can then click Accept (tick) or Reject (cross). Further options will then appear.
If you accept an insertion, it will lose its colour and look like normal text. If you accept a deletion, it will disappear.
Edits will often appear as two-part changes, ie, a deleted word and an inserted word to replace it. If you highlight both words together, you can accept or reject them in one go.
Accept all changes
One of the options when you click the ‘Accept’ button is to ‘Accept All Changes’. This does exactly what it says – all edits will be incorporated at once (ie, they will no longer show in a different colour), and your text will become the new, corrected version.
This saves a lot of time. The disadvantage is that once done, you can’t jump to individual changes any more. So it’s best to leave this option until you are really happy with the whole text. One suggestion is to save another copy and Accept All Changes on the new version. (I usually offer my clients the option of having two versions sent to them – one with Tracked Changes showing, and one ‘clean’ copy.)
……………………………………………………………………………………………..
I hope this has been useful. There is much more under the Review tab to enhance your experience of editing – happy exploring!